Why a Dimmer Switch Three Way Setup Can Transform Your Home's Lighting
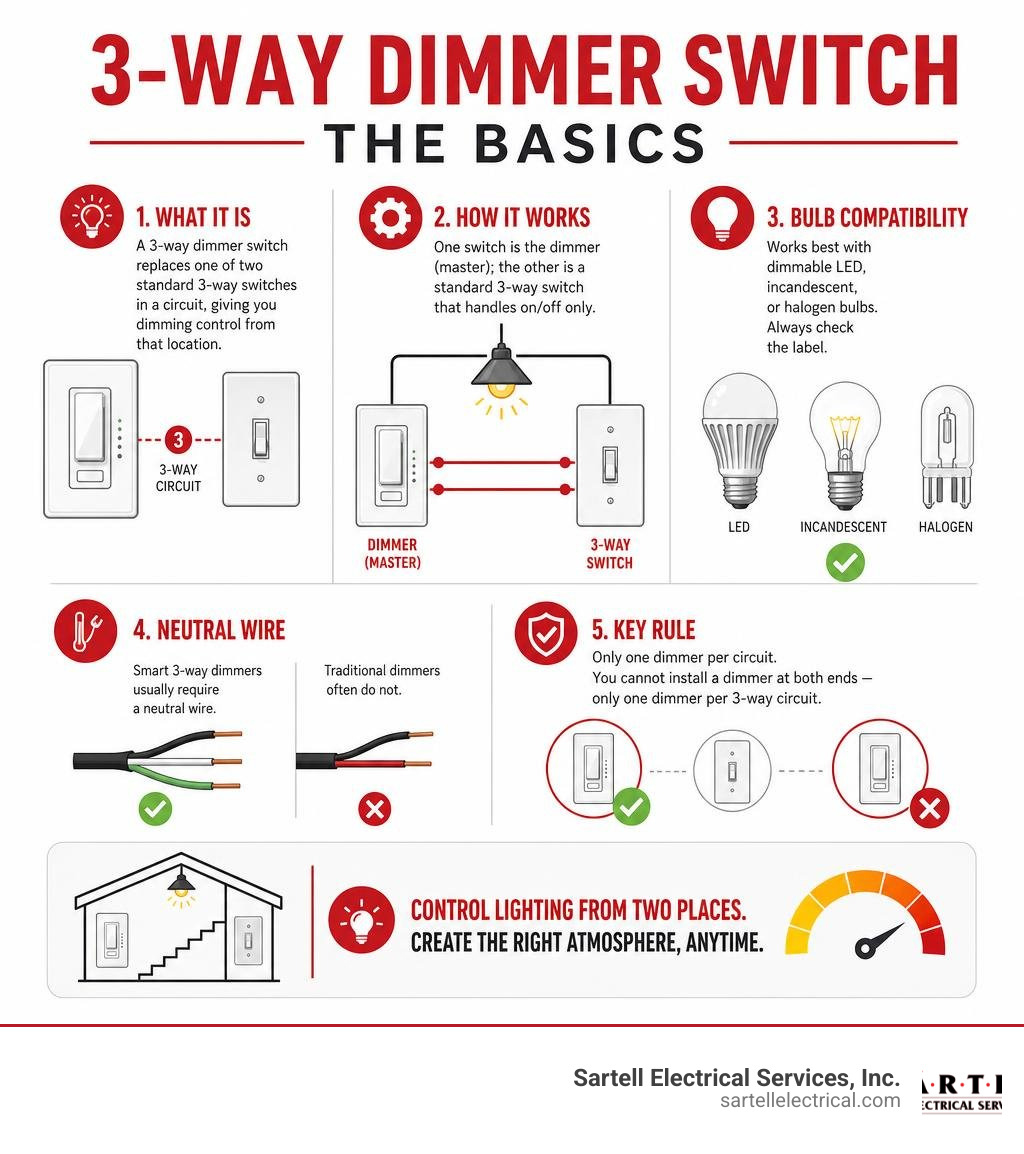
A dimmer switch three way setup lets you control the brightness of a light from two different locations — for example, at both ends of a staircase or hallway. Here's a quick summary of what you need to know:
- What it is: A 3-way dimmer switch replaces one of two standard 3-way switches in a circuit, giving you dimming control from that location.
- How it works: One switch is the dimmer (master); the other is a standard 3-way switch that handles on/off only.
- Bulb compatibility: Works best with dimmable LED, incandescent, or halogen bulbs. Always check the label.
- Neutral wire: Smart 3-way dimmers usually require a neutral wire. Traditional dimmers often do not.
- Only one dimmer per circuit: You cannot install a dimmer at both ends — only one dimmer per 3-way circuit.
Getting this wrong is a common and frustrating mistake. The good news is that once you understand how 3-way dimmer circuits are set up, choosing and installing the right switch becomes much more straightforward.
Multi-location dimming is one of the most requested upgrades we see in both residential and commercial spaces — and for good reason. It adds convenience, improves ambiance, and can reduce energy use when paired with the right LED bulbs.
I'm Ed Sartell, President of Sartell Electrical Services, and I've been installing and troubleshooting dimmer switch three way circuits across Massachusetts since 1985. In that time, I've seen nearly every wiring configuration and compatibility challenge imaginable, so I'll walk you through everything you need to know to get this right.
Understanding the Dimmer Switch Three Way Setup
To understand a dimmer switch three way system, we first need to look at how multi-location lighting operates. In a standard home, a single-pole switch controls a light fixture from one wall location. It has two brass terminal screws (plus a green ground screw) and simply opens or closes the electrical pathway.
A three-way circuit is entirely different. It is designed to control a light fixture from two distinct locations. To do this, a three-way circuit requires two three-way switches. Each of these switches has three terminal screws (excluding the ground screw):
- One common terminal (usually a dark, oxidized copper or black screw).
- Two traveler terminals (typically brass or lighter-colored screws).
The traveler terminals connect the two switches together via a pair of "traveler wires" (usually running within a 3-conductor cable containing black, red, white, and bare copper wires). The common terminal on the first switch connects directly to the incoming hot wire from the circuit breaker panel (the "Line"). The common terminal on the second switch connects directly to the light fixture itself (the "Load").
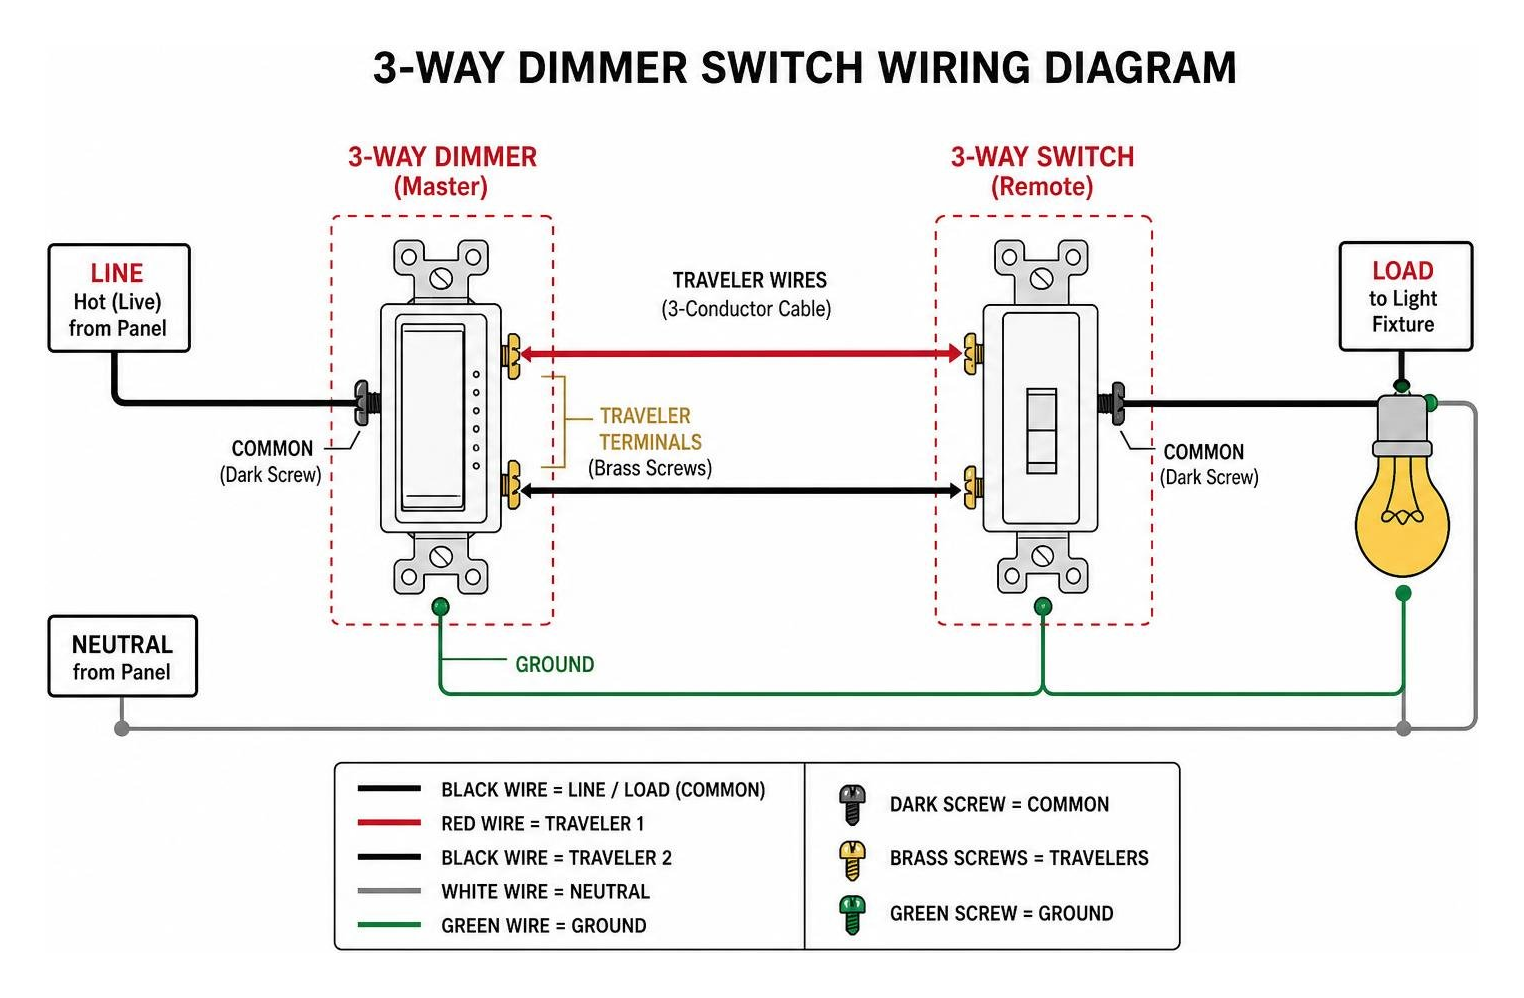
When you flip either switch, you redirect the electricity from one traveler wire to the other. If both switches are aligned to use the same traveler wire, the circuit closes, and the light turns on. If you flip either switch to the opposite position, the path breaks, and the light turns off.
So, where does a dimmer fit into this dance?
When adding dimming capabilities, homeowners often wonder: When installing a three way dimmer switch, does it matter which switch... is replaced? In a standard analog setup, you can replace either of the two three-way switches with a three-way dimmer. However, because of how electrical current is modulated to dim a light, you can only install one analog dimmer per circuit. The other switch must remain a standard, mechanical three-way toggle or rocker switch.
If you try to put two standard dimmers on the same 3-way circuit, they will fight for control of the voltage, causing severe flickering, buzzing, or complete circuit failure. If you want to know more about this limitation, check out our deep dive on Dimmer Duos: Can You Really Use Two Dimmers on One 3-Way Switch?.
Properly identifying the terminals on your existing switches is the absolute key to a successful installation. If you mix up the common wire with one of the traveler wires, your switches will behave erratically—for example, one switch might only work if the other switch is flipped to a specific position. For step-by-step help with terminal identification, read our guide on 3-Way Light Switch Terminals: How to Identify Common and Traveler Screws.
Key Features, Smart Tech, and Bulb Compatibility
Choosing a dimmer switch three way model in 2026 requires looking closely at bulb compatibility and dimming technologies. Gone are the days when every bulb was a simple incandescent wire filament. Today, we mix and match LED, CFL, and incandescent bulbs, which can lead to significant compatibility issues if you install the wrong hardware.
Traditional incandescent dimmers work by slicing out a portion of the AC voltage wave—a process known as forward-phase (or leading-edge) dimming. While this works beautifully for resistive loads like standard bulbs, it often wreaks havoc on the sensitive electronic drivers found in modern LED bulbs. LEDs prefer reverse-phase (or trailing-edge) dimming, which turns the current off at the end of the wave cycle rather than the beginning.
To solve this headache, top manufacturers have introduced "universal" dimmers. For instance, the radiant Tru-Universal Dimmer Switch | Legrand is designed to automatically calibrate itself to the specific load type connected to it. Whether you are running electronic low-voltage (ELV) drivers, dimmable LEDs, compact fluorescents, or old-school halogens, these advanced switches adjust their dimming phase to eliminate humming, buzzing, and flickering.
When shopping for a dimmer, you will also need to decide whether your home's wiring can support a neutral-wire switch or if you need a no-neutral solution. Most smart switches require a neutral wire to keep their internal Wi-Fi or Bluetooth radios powered when the lights are turned off. If you live in an older Massachusetts home built before the mid-1980s, your switch boxes might not have neutral wires. In those situations, you will need to look for specialized no-neutral dimmers. You can read more about these options in our guide, The No-Neutral Solution for Your 2-Wire Dimmer Switch.
| Bulb Type | Dimming Technology | Neutral Wire Required? | Key Characteristics |
|---|---|---|---|
| Incandescent / Halogen | Forward Phase (Leading Edge) | No | Warm glow, highly reliable, high power consumption |
| Dimmable LED | Reverse Phase (Trailing Edge) | Optional (Highly Recommended) | Energy-efficient, long life, prone to flickering on cheap dimmers |
| CFL (Compact Fluorescent) | Specialized Ballast | No | Slow start-up, limited dimming range (usually down to 10-20%) |
| Smart LED Bulbs | Internal App/Voice Control | Yes (at the switch if using smart switches) | Do not pair with standard wall dimmers; requires constant voltage |
Smart Home Integration and Voice Control
If you want to step into the future, a smart dimmer switch three way system is the way to go. Smart dimmers allow you to adjust your lighting via voice assistants like Amazon Alexa, Google Assistant, or Apple HomeKit, and set automated schedules using your smartphone.
Unlike traditional analog setups where you are strictly limited to one dimmer per circuit, smart lighting ecosystems offer a workaround. With systems like Lutron Caséta or Maestro, you install a "master" smart dimmer at one end of the 3-way circuit and pair it with wireless remotes (like Pico remotes) or specialized "companion" switches at the other locations. This configuration allows you to dim and brighten your lights from both ends of the room. For installation tips on these advanced systems, consult the Maestro LED Dimmer 3-Way 4-Way Install Tips documentation.

Additionally, modern smart switches often utilize Wi-Fi mesh technology, which allows multiple switches to communicate directly with one another. This means you can create "scenes"—for example, pressing a button on your hallway dimmer can simultaneously dim your living room lights, turn on your reading lamp, and lock your smart doors.
Troubleshooting Common Dimming Issues
Even with high-quality components, you may occasionally run into issues with your dimmer switch three way setup. Here are the most common problems we encounter in Middlesex and Essex counties, along with how to fix them:
- Flickering or Strobing: This usually happens when non-dimmable LED bulbs are paired with a dimmer switch, or when the total wattage of your LED bulbs is below the dimmer's minimum load requirement. Replacing the bulbs with high-quality, dimmable LEDs or adjusting the dimmer's low-end trim usually solves this.
- Buzzing or Humming: This is a classic symptom of voltage mismatch. If you hear a physical buzz coming from your light fixture or the wall switch, your dimmer is likely using forward-phase dimming on a bulb that requires reverse-phase dimming. Upgrading to a universal dimmer like Legrand’s Tru-Universal line will stop the noise.
- The "Pop-On" or Delay: Sometimes, when you slide a dimmer up from the off position, the lights remain dark until the slider is halfway up, at which point they suddenly burst onto a bright setting. This delay can be corrected by adjusting the high-end and low-end trim settings on your switch. Many modern dimmers have a small physical dial or a programming sequence to set these limits.
- The Ghost Glow: If your LED bulbs emit a faint glow even when the switch is turned completely off, there is likely a small amount of leakage current running through the circuit. This is common in smart switches that do not use a neutral wire, as they must trickle a tiny amount of power through the load to keep their internal Wi-Fi radios active. Installing a lutron LUT-MLC capacitor at the light fixture or switching to a neutral-required dimmer will eliminate the ghost glow.
If you are struggling to get your wiring sorted out, take a look at our comprehensive guide on Dimmer Switch Wiring for more troubleshooting tips.
Wiring and Installation Guide
Before you pick up a screwdriver, let's talk about safety. Working with electricity carries inherent risks. Always turn off the power at the main circuit breaker panel before touching any wires. Never rely solely on the wall switch to turn off the power; always use a reliable, non-contact voltage tester to verify that the wires inside the gang box are completely dead.
If you want a complete, professional overview of the process before starting, read our guide on Wiring Wonders: Installing Your 3-Way Dimmer Switch Like a Pro or watch this helpful video tutorial on How to Install a 3-Way Dimmer Switch (In Under 6 Minutes!) - YouTube.
To complete this installation, you will need a few basic tools:
- Non-contact voltage tester
- Flathead and Phillips screwdrivers
- Wire strippers/cutters
- Electrical tape
- Wire nuts (wire connectors)
- Utility knife (for carefully stripping outer cable jackets)
Step-by-Step Dimmer Switch Three Way Installation
Once you have gathered your tools and verified that the power is off, follow these steps to install your new dimmer switch three way:
- Remove the Old Switch: Unscrew the faceplate and the mounting screws holding the existing three-way switch in the wall box. Carefully pull the switch out, keeping the wires attached.
- Identify the Common Wire: Look closely at the existing switch. Locate the screw terminal that is a different color than the others (usually black or dark copper). This is your common terminal. Mark the wire attached to this screw with a piece of black electrical tape. The other two wires are your travelers.
- Disconnect the Wires: Unscrew the terminals and disconnect the old switch completely.
- Wire the New Dimmer: Take your new three-way dimmer switch. Connect the green (or bare copper) ground wire to the ground wire in your wall box. Next, connect the marked common wire to the common terminal on your dimmer (often labeled "COM" or marked by a black screw).
- Connect the Travelers: Connect the two remaining traveler wires to the two traveler terminals on the dimmer. In a standard 3-way circuit, it does not matter which traveler wire goes to which traveler terminal.
- Secure and Test: Carefully fold the wires back into the gang box, mount the switch with the screws, and attach the faceplate. Turn the circuit breaker back on and test the operation from both switch locations.

For advanced wiring diagrams and alternative physical placements (such as installing a smart module), refer to the 3-way wiring installation for Dimmer Switch - Aeotec Help Desk support page.
Identifying Wires for Your Dimmer Switch Three Way
One of the trickiest parts of this process is identifying wires when the colors in your wall box do not match standard diagrams. In the United States, standard residential wiring typically uses:
- Black: Hot (Line) or Load
- White: Neutral (though in 3-way switch loops, white is sometimes used as a traveler or hot wire—always verify!)
- Red: Traveler
- Bare Copper or Green: Ground
However, older homes in towns like Reading, Arlington, or Medford may have non-standard wiring colors or complex switch loops. The most reliable way to identify your wires is by using a voltage tester. With the power safely off, separate the wires so they are not touching. Turn the breaker back on temporarily and use your tester to see which wire is carrying live voltage. This live wire is your "Line" (incoming hot) and will connect to your first switch's common terminal.
For a complete breakdown of switch loop physics and wire identification, check out Wiring Made Easy: The 3-Way Switch Hook-Up Diagram Every Homeowner Needs.
Frequently Asked Questions about 3-Way Dimmers
Do 3-way dimmer switches require a neutral wire?
It depends on the type of dimmer you choose. Traditional analog toggle or slide dimmers do not require a neutral wire. They simply interrupt the hot path to modulate voltage. However, modern smart dimmers that connect to Wi-Fi, Zigbee, or Bluetooth usually require a neutral wire to keep their internal processors powered when the lights are off. If your home was built before 1985 and has not been rewired, you may need to look for specialized "no-neutral" smart switches. For a detailed breakdown of your options, read The No-Neutral Solution for Your 2-Wire Dimmer Switch.
Can you put two dimmer switches on a 3-way circuit?
No, you cannot put two standard analog dimmer switches on a single three-way circuit. If you attempt to do so, the two dimmers will interfere with each other's voltage regulation, resulting in rapid flickering, buzzing, or a complete failure to turn on. You must use one dimmer paired with a standard mechanical 3-way switch. If you want dimming control from both locations, you must purchase a specialized smart dimmer system that utilizes a "master" dimmer at one end and a digital "companion" switch or wireless remote at the other. Learn more in our article, Dimmer Duos: Can You Really Use Two Dimmers on One 3-Way Switch?.
Why are my LED lights flickering on a 3-way dimmer?
Flickering is almost always caused by a compatibility issue between the LED bulb's internal driver and the dimmer switch's circuitry. Many older dimmers were designed exclusively for high-wattage incandescent loads and cannot properly regulate the low wattage drawn by modern LEDs. To fix this, make sure your bulbs are explicitly labeled "dimmable" and that you are using an LED-compatible dimmer. Many advanced switches, such as the Toggle LED Advanced Dimmer Light Switch| Single Pole 3-Way, feature built-in trim adjustment dials that let you raise the minimum voltage level to eliminate low-end flickering.
Conclusion
Upgrading to a dimmer switch three way system is a fantastic way to enhance your home's comfort, save on energy bills, and set the perfect mood in any room. However, dealing with older wiring, identifying traveler lines, and ensuring smart home compatibility can quickly turn a quick DIY afternoon into a frustrating, head-scratching weekend.
If you are located in Middlesex County, Essex County, Norfolk County, Suffolk County, or anywhere in the Greater Boston area, you do not have to tackle this alone. At Sartell Electrical Services, Inc., we have spent over 30 years helping homeowners solve complex wiring puzzles safely and efficiently. Whether you need help swapping out a single switch or designing a whole-home smart lighting layout, our team of licensed, local professionals is here to help.
Ready to upgrade your home’s lighting without the hassle? Contact us today to schedule your professional 3-Way Dimmer Switch Install and let us handle the wiring wonders for you!