Underground electrical wiring residential installations offer homeowners a clean, safe, and reliable way to power outdoor structures, landscape lighting, and electrical equipment without the visual clutter of overhead lines.
Key Benefits of Underground Residential Wiring:
Underground wiring does require careful planning, proper materials, and adherence to National Electrical Code (NEC) depth requirements. The most common methods include direct burial using UF-B cable (24 inches deep) or running wires through protective conduit (6-18 inches deep depending on material).
As master electrician and former chief electrical inspector noted in recent industry guidance: “Most underground wiring projects were successful and are still in operation today… But there were a few painful lessons along the way.” These lessons typically involve improper depth, inadequate protection, or skipping the crucial step of calling 811 before digging.
I’m Ed Sartell, and I’ve been installing underground electrical systems for Massachusetts homeowners since 1985. Through nearly four decades of underground electrical wiring residential projects, I’ve seen how proper installation techniques ensure decades of reliable service while protecting your investment and safety.

Key terms for underground electrical wiring residential:
Planning your underground electrical wiring residential project requires careful preparation. You need to know what’s already buried, understand local codes, and choose the best installation method for your property.

After three decades of electrical work in Massachusetts, I’ve learned that taking time upfront is key. It’s tempting to start digging when you’re excited about a new project, but patience in the planning phase pays dividends.
Here’s the golden rule that has no exceptions: call 811 before you dig. Period. Full stop. This call could literally save your life.
When you contact Call Before You Dig at 811, utility companies will send crews to mark existing underground lines with colored flags and spray paint, helping you avoid gas lines, electrical cables, and fiber optic networks.
The scary reality is that striking a buried gas line can cause explosions, while hitting electrical lines can electrocute you or cause neighborhood-wide power outages. I’ve seen homeowners face thousands of dollars in fines for damaging utility infrastructure – money that could have been saved with one simple phone call.
In Massachusetts, calling 811 isn’t just smart practice; it’s legally required. The utility marking service is free, and crews typically arrive within a few business days. Waiting a few extra days beats spending weeks dealing with damaged utilities or worse.
Paperwork is an essential step. Underground electrical wiring residential projects require permits in most Massachusetts communities for good reason.
The National Electrical Code (NEC) provides the standards for safe electrical installation. Massachusetts builds on these national standards with state-specific amendments reflecting our unique climate and safety concerns.
Permits trigger an inspection process to ensure your installation meets current safety standards. While it adds time and cost, unpermitted work can create headaches when you try to sell your home or file insurance claims for electrical fires.
As a licensed home electrician serving the Greater Boston area, we handle all permit paperwork and coordinate inspections. It’s part of our comprehensive approach to electrical services – we want you focused on enjoying your new installation, not wrestling with bureaucracy.
Here’s where we get into the nuts and bolts of your project. You have two main options for getting power underground: direct burial cable or conduit installation. Each has its place, and the right choice depends on your specific situation.
Direct burial using UF-B cable is a straightforward, less expensive option. Its tough outer jacket handles direct contact with soil and moisture. However, it requires a deeper trench (typically 24 inches) for protection. With GFCI protection, a 12-inch depth may be possible for some 120-volt circuits.
Conduit installation offers superior protection. Using PVC or Rigid Metal Conduit (RMC) creates a protective tunnel for wires, often allowing for shallower burial depths (as little as 6 inches for RMC or 18 inches for PVC).
| Consideration | Direct Burial Cable | Conduit Installation |
|---|---|---|
| Material Cost | Lower initial cost | Higher upfront investment |
| Installation Labor | Less complex installation | More detailed work required |
| Future Flexibility | Difficult to modify later | Easy to add or replace wires |
| Soil Conditions | Best in soft, stable soil | Better for rocky or challenging soil |
| Long-term Protection | Vulnerable to damage | Superior wire protection |
The soil conditions on your property play a huge role in this decision. Rocky New England soil can be tough on direct burial cable, while conduit provides a protective barrier. If you think you might want to add circuits later – say, for holiday lighting or a future generator connection – conduit makes future upgrades much easier.
We evaluate each project individually, considering factors like project cost, labor requirements, and your property’s unique conditions to recommend the best approach for your underground electrical wiring residential installation.
When it comes to underground electrical wiring residential projects, the National Electrical Code (NEC) isn’t just making suggestions – it’s setting precise depth requirements that could save your life. After nearly four decades in this business, I’ve seen what happens when these depths aren’t respected, and trust me, it’s not pretty.
The key term here is “cover” – that’s the minimum distance between the top of your wiring or conduit and the finished ground surface. Think of it as your safety buffer against someone with a shovel having a very bad day. Your actual trench will need to be slightly deeper to account for bedding material, but these cover requirements from NEC Table 300.5 are your starting point.

Underground Feeder (UF-B) cable is designed to go straight into the dirt, but it’s not invincible. The standard depth requirement is 24 inches – deep enough that casual digging won’t reach it, but shallow enough that you won’t need heavy equipment for every repair.
Here’s where things get interesting: GFCI protection can be your friend. If you’re running a 120-volt circuit that’s 20 amps or less, and it’s protected by a Ground-Fault Circuit Interrupter, you can reduce that burial depth to just 12 inches. This isn’t just about saving your back – it’s about the NEC recognizing that GFCI protection adds a crucial safety layer against electrical shock.
But don’t think you can just bury UF cable and walk away. Wherever that cable transitions from underground to above-ground – like where it enters your house or connects to an outdoor panel – you’ll need mechanical protection. That means running it through Schedule 80 PVC conduit for 8 feet above ground and 18 inches below grade. Think of it as armor for the most vulnerable part of your installation.
Using conduit is like giving your wires a protective suit, and the NEC rewards that extra protection with reduced burial depth requirements. The type of conduit you choose makes a big difference in how deep you’ll be digging.
Rigid Metal Conduit (RMC) and Intermediate Metal Conduit (IMC) are the heavy-duty options. These metal conduits are so robust that they only need 6 inches of cover when they’re under concrete or equivalent protection. In regular soil, you’re looking at 18 inches deep. Here’s a pro tip: if you sleeve UF cable with RMC, you can drop from the standard 24-inch requirement down to just 6 inches – a real game-changer in rocky New England soil.
PVC conduit strikes a nice balance between protection and cost. Standard PVC requires 18 inches of burial depth, but like its metal cousins, this can drop to 12 inches when it’s under a building, driveway, or protected by 2 inches of concrete. I’ve used miles of PVC conduit over the years, and when installed properly, it provides excellent protection at a reasonable cost.
Not all electrical wiring is created equal, and the NEC recognizes this with dramatically different depth requirements based on voltage. This is where understanding your project’s specific needs really pays off.
Low-voltage applications – think landscape lighting at 12 or 24 volts, or irrigation controls – only need 6 inches of burial depth. These systems typically operate under 30 volts, making them much safer to work with and requiring less protection from accidental contact.
High-voltage circuits running 120V or 240V are a different story entirely. These require the deeper burial depths we discussed: 24 inches for direct burial UF cable, 18 inches for PVC conduit, and varying depths for metal conduit depending on the installation conditions.
One critical safety note: low-voltage and high-voltage wires cannot share the same conduit. The NEC is very clear about this separation requirement. However, they can share the same trench if they’re run in separate conduits with appropriate spacing – something we handle carefully on every underground electrical wiring residential project.
Understanding these depth requirements isn’t just about following rules – it’s about creating an installation that will serve your family safely for decades to come. When in doubt, we always err on the side of deeper burial and better protection.
Turning your plan into reality is the exciting part. Installing underground electrical wiring residential systems requires precision and hard work. The right approach ensures a project lasts for decades without issues.
While some homeowners may be tempted by DIY, I always recommend professional installation. Your family’s safety, code compliance, and your investment’s longevity are at stake. Professionals have specialized equipment to manage the work efficiently. This comprehensive approach is part of our commitment to quality residential electrical upgrades.

Success in underground electrical wiring residential projects starts with the right tools. The right equipment makes the work safer and more reliable.
For digging, a trenching machine is ideal for longer runs, creating straight, uniform trenches and saving your back. For shorter runs or tight spaces, a good trenching shovel works well.
The heart of any underground installation is choosing between UF-B cable for direct burial or individual THWN-2 wires for conduit runs. THWN-2 wires are specifically rated for wet locations, which is what underground conduits are considered.
When working with conduit, we rely on PVC conduit (Schedule 40 for buried sections, Schedule 80 for exposed areas), along with rigid metal conduit when needed. The fittings are just as important: conduit connectors, couplings, LB bodies for direction changes, and duct seal putty for watertight seals.
Wire pulling tools are essential for a smooth installation. Fish tape guides wires through conduit, and wire lubricant reduces friction. A quality conduit bender ensures clean, professional runs.
Don’t forget safety and protection materials: warning ribbon tape to alert future diggers, sand or pea gravel for bedding, and sometimes treated wood planks for additional protection over direct-buried cables.
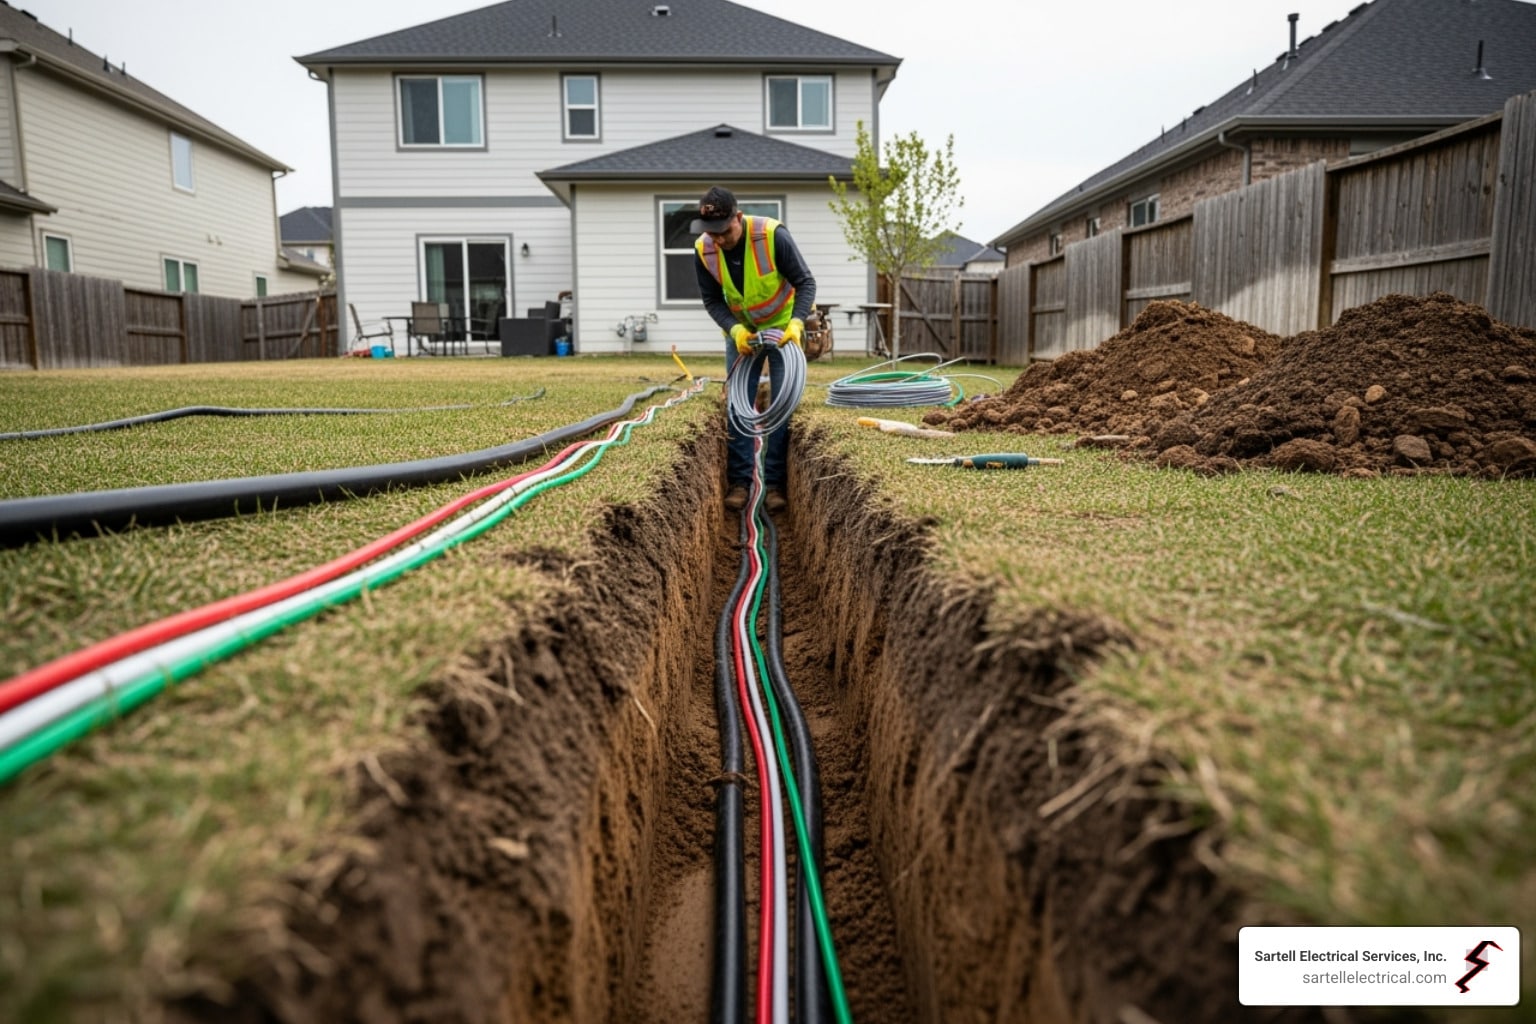
This is where the real work begins, and proper technique here determines whether your underground electrical wiring residential system will serve you reliably for decades.
Creating the perfect trench starts with digging to the exact NEC-required depth – 24 inches for UF cable, 18 inches for PVC conduit, or 6 inches for rigid metal conduit under concrete. The trench should be 6-8 inches wide for comfortable working room.
Massachusetts soil can be challenging. For dealing with rocks and roots, we create a protective bed using at least 3 inches of sand or pea gravel at the bottom of the trench. This cushions the wiring and prevents damage from sharp objects.
Laying the cable or conduit requires attention to detail. For conduit runs, we assemble sections with appropriate connectors and solvent cement for PVC. If using individual wires, we pull them through before backfilling.
Protecting your investment involves multiple layers of defense. We place sand bedding below and above the conductors, then install bright electrical warning ribbon tape at least 12 inches above the wiring. This tape warns anyone digging in the future.
Backfilling requires patience. We carefully return the excavated soil, ensuring no large rocks contact the wiring. The soil is compacted in layers to prevent future settling without damaging the components.
In Massachusetts winters, preventing frost heave is crucial. We use expansion fittings in conduit runs or leave slight service loops in cables at termination points to allow for ground movement.
The transition from buried wiring to above-ground connections is often the most vulnerable part of any underground electrical wiring residential installation. This is where weather, physical damage, and moisture intrusion pose the biggest threats.

Mechanical protection is non-negotiable where wiring emerges from the ground. The NEC requires conduit protection for at least 8 feet above grade, extending 18 inches below grade. For exposed sections, we use heavy-duty Schedule 80 PVC conduit for its superior impact resistance.
LB fittings are our go-to for making clean 90-degree transitions from horizontal to vertical runs up exterior walls. Their removable covers make wire pulling easier and create a professional appearance.
Sealing and waterproofing these connections is where experience shows. Conduit ends and bodies must be sealed to prevent moisture and condensation, especially between different temperature zones. We use duct seal putty, a pliable material that never hardens.
Any splices or connections at the transition point are made within waterproof junction boxes or with approved waterproof connectors. Outdoor receptacles require weather-resistant enclosures and GFCI protection for code compliance and family safety.
The result of this careful attention to detail is an underground electrical wiring residential system that works reliably in all weather, looks professional, and provides decades of trouble-free service.
After nearly four decades of installing underground electrical wiring residential systems throughout Massachusetts, I’ve heard just about every question homeowners can think of. Let me share answers to the ones that come up most often during our consultations.
This is probably the question I get asked most, and I understand why – it seems logical to dig once and get everything done at the same time. The good news is that you can share a trench with other utilities, but there are some important rules to follow.
Gas lines can absolutely share a trench with your electrical wiring, but they need their space. The NEC requires at least 12 inches of horizontal separation between electrical and gas lines within the same trench. Think of it like lanes on a highway – they’re going to the same place, but they need to stay in their own lanes.
When these utilities cross each other, you need 12 inches of vertical clearance at the crossing point. If your soil conditions or space constraints make this impossible, you’ll need to add mechanical protection like a concrete slab or sandbag barrier.
Low-voltage cables for landscape lighting or irrigation controls present a different situation. These 12-24 volt systems can share your trench, but they absolutely cannot share the same conduit with your 120V or 240V circuits. Each voltage level needs its own separate conduit – it’s a safety requirement that prevents dangerous voltage mixing.
The beauty of this approach is that you get the efficiency of digging once while maintaining all the safety separations required by code.
GFCI protection is one of the most important safety features in any underground electrical wiring residential installation. These devices can literally save lives by shutting off power in milliseconds when they detect a ground fault.
Every outdoor receptacle must have GFCI protection – no exceptions. These outlets need to be weather-resistant and equipped with “in-use” weatherproof covers that protect the outlet even when something is plugged in. I’ve seen too many outdoor outlets damaged by weather because they didn’t have proper protection.
Here’s where GFCI protection gets really interesting for underground installations: it can actually reduce your required burial depth. If you’re using UF cable for a 120-volt circuit that’s 20 amps or less, GFCI protection allows you to bury the cable at just 12 inches instead of the standard 24 inches. This can be a real game-changer when you’re dealing with rocky soil or other challenging digging conditions.
Since underground conduits are considered wet locations by the NEC, any individual wires run through them must be rated for wet conditions (like THWN-2 wire). The GFCI protection adds that extra layer of safety that gives homeowners peace of mind.
This is such a smart question, and I wish more homeowners thought about it upfront. Nothing breaks my heart more than getting a call about accidentally damaged underground wiring that could have been prevented with proper marking.
Warning ribbon tape is your first line of defense. We install this bright red or yellow tape at least 12 inches above every buried electrical line. It typically says something like “CAUTION: BURIED ELECTRIC LINE BELOW” and serves as a visual alarm for anyone digging in the future. It’s inexpensive insurance that can prevent costly accidents.
Creating a detailed map of your underground system is equally important. I recommend drawing a simple diagram that shows the exact route of your trenches, burial depths, wire types, and locations of any outlets or junction boxes. Include measurements from permanent landmarks like your house foundation, large trees, or property lines. Keep this map with your electrical panel documentation – future electricians (or even future you) will thank you for it.
For long runs or critical areas, permanent above-ground markers like small posts or discrete plaques can provide additional location reference. These are especially valuable at property boundaries or where your wiring changes direction.
Proper marking isn’t just about protecting your investment – it’s about preventing dangerous accidents that could harm someone digging in your yard years from now.
When done right, underground electrical wiring residential projects transform your outdoor spaces while keeping all those unsightly power lines hidden beneath your feet. You get the power you need for outdoor lighting, workshops, pool equipment, or that new deck – all without cluttering up your beautiful landscape.
Throughout this guide, we’ve walked through every critical step together. We started with that absolutely non-negotiable first call to 811 (seriously, don’t skip this one!), moved through the permit process, and dove deep into those NEC depth requirements that can seem confusing at first glance. Whether you’re dealing with direct burial UF cable at 24 inches deep or working with PVC conduit at 18 inches, getting these depths right isn’t just about following rules – it’s about protecting your family and your investment for decades to come.
The installation process itself – from that first shovel of dirt to the final above-ground connection – requires precision and the right tools. We’ve seen too many weekend warriors start these projects with good intentions, only to run into complications with rocky soil, tricky transitions, or code compliance issues. While we admire the DIY spirit, electrical work underground involves safety considerations that go far beyond typical home improvement projects.
Why professional installation matters:
The difference between a good underground electrical installation and a great one often comes down to experience. We’ve learned (sometimes the hard way) how Massachusetts soil behaves in different seasons, which conduit materials hold up best in our climate, and how to create those smooth transitions from underground to above-ground that look professional and last for years.
After nearly four decades of installing underground electrical wiring residential systems across Essex County, Middlesex County, Norfolk County, and throughout Greater Boston, we’ve developed systems and techniques that ensure your project gets done right the first time. No callbacks for failed inspections, no mysterious power outages during the first winter, and no surprises when you’re ready to sell your home.
For peace of mind and guaranteed compliance on your project, trust the experts at Sartell Electrical Services. We handle everything from that initial 811 call through the final inspection, so you can focus on enjoying your newly powered outdoor spaces rather than worrying about whether everything was installed correctly.
Contact us for your residential electrical needs today, and let’s discuss how we can bring reliable, hidden power exactly where you need it on your property.
236 Ash St Reading, MA 01867
(By Appointment Only)