
The Fastest Way to Transform Any Room With Recessed Lighting
Recessed lighting installation is one of the most effective upgrades you can make to any room in your home. Clean lines, no bulky fixtures, and light exactly where you need it.
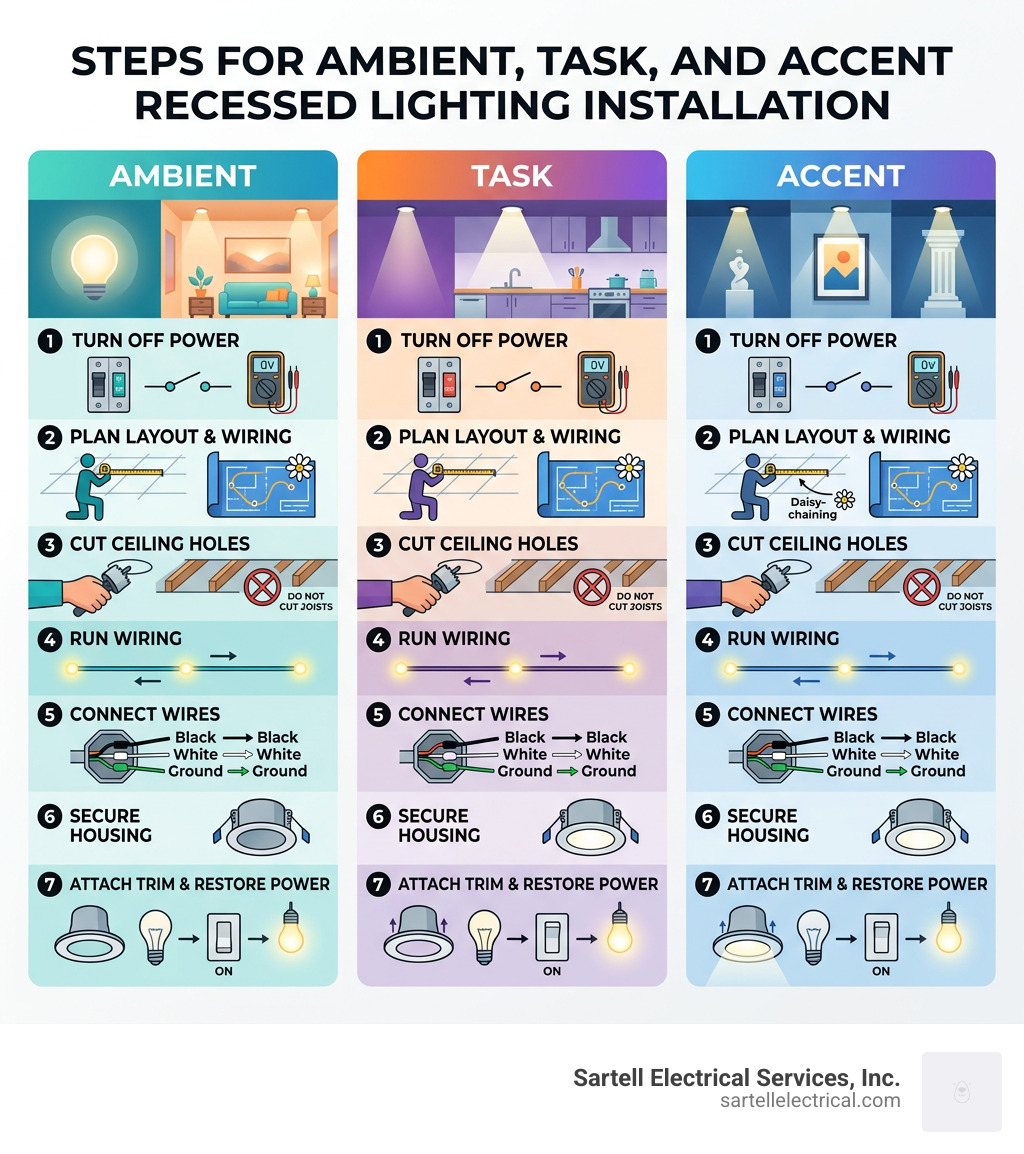
Here's a quick overview of how to install recessed lighting:
- Turn off power at the breaker and verify with a non-contact voltage tester
- Plan your layout — space lights 4 to 6 feet apart, avoiding joists
- Cut holes in the ceiling using a hole saw matched to your fixture size
- Run wiring from an existing power source, daisy-chaining between fixtures
- Connect wires — black to black, white to white, ground to ground
- Secure the housing into the ceiling hole using mounting clips
- Attach the trim and bulb, then restore power and test
Most homeowners with basic electrical experience can complete a room in a single day. If you're adding a brand-new circuit, however, that's a job for a licensed electrician.
Recessed lighting — also called can lights or downlights — sits flush with your ceiling. That means no dangling fixtures, no visual clutter, and a modern look that can add 1% to 3% to your home's value. LED versions use 75% less energy and last up to 25 times longer than traditional incandescent bulbs.
This guide walks you through every step, from planning your layout to flipping the switch on a finished install.
I'm Ed Sartell, President of Sartell Electrical Services, Inc., and I've been overseeing recessed lighting installation projects across Massachusetts since 1985. Whether you're tackling this yourself or need a professional to step in, the planning principles and safety steps in this guide come straight from nearly four decades in the trade.
Easy Recessed lighting installation glossary:
Planning Your Recessed Lighting Installation
Before you pick up a drill, you need a blueprint. A common mistake we see in Greater Boston homes is "Swiss cheese ceiling syndrome"—where holes are cut haphazardly because the homeowner didn't account for what was behind the drywall.
A successful recessed lighting installation begins with understanding your room's dimensions and the structural "bones" of your house. Most residential ceilings in areas like Reading or Andover use joists spaced 16 or 24 inches apart. You must locate these using a high-quality stud finder to ensure your lights don't hit a beam.
Determining the Number of Recessed Lighting Installation Fixtures
How many lights do you actually need? A good rule of thumb is to divide the ceiling height by two. If you have 8-foot ceilings, space your lights roughly 4 feet apart. For a standard 12-by-12-foot room, you’ll typically look at four to six fixtures for balanced illumination.
When planning, consider the "focal points." Do you want to highlight a piece of art on the wall (accent lighting) or brighten the kitchen island (task lighting)? You should also calculate your circuit's wattage capacity. A standard 15-amp circuit can handle up to 1,440 watts, while a 20-amp circuit handles 1,920 watts. Since modern LED recessed lights use very little power, you can often add a dozen or more to a single circuit without a hitch.
For those looking to go green, choosing the right fixtures is a key part of our energy-efficiency solutions.
| Fixture Size | Common Application | Best For |
|---|---|---|
| 4-inch | Accent or Task | Hallways, bathrooms, over counters |
| 6-inch | General Ambient | Living rooms, kitchens, large basements |
Choosing the Right Recessed Lighting Installation Housing
The "housing" is the part of the light that stays hidden inside the ceiling. Choosing the wrong one is a fire hazard. There are two main categories:
- New Construction Housings: Used when the ceiling joists are exposed (during a build or major renovation).
- Remodel Housings: Designed to be inserted through a hole in existing drywall and secured with clips.
You also need to check for IC-rating (Insulation Contact). If your ceiling has fiberglass or cellulose insulation, you must use IC-rated fixtures. These are designed to stay cool enough to touch insulation safely. Additionally, airtight seals prevent conditioned air from leaking into your attic, which is vital for Massachusetts winters. Using high-efficiency LED lighting in these housings ensures longevity and lower utility bills.
Essential Tools and Materials for Success
To get this done in one day, you need the right gear. Don't try to "eye it" with a drywall saw; the results will look messy.

The Must-Have List:
- Adjustable hole saw: This is a lifesaver. It lets you cut perfect circles without the jagged edges of a hand saw.
- Stealth Dust Mask: Drywall dust is nasty stuff. Protect your lungs.
- Ultra Slim LED Lights: These "wafer" style lights are incredibly popular because they don't require a large metal can, making them easier to fit around obstructions.
- Non-contact voltage tester: To double-check that the power is truly off.
- Fish tape: For pulling Romex cable through the ceiling.
- Wire strippers and connectors: For secure electrical joins.
Step-by-Step Guide to a Professional Finish
Once you have your plan and your tools, it’s time to get to work. Follow these steps for a clean, code-compliant recessed lighting installation.
1. Power Down and Prep
Locate your circuit breaker and flip the switch for the room you're working in. Use your voltage tester on the existing light fixture or outlet to ensure no current is flowing. If you're replacing an old pendant or ceiling fan, remove it and the existing electrical box.
2. Mark and Cut
Use the template provided with your lights to mark the center of each hole. Drill a small pilot hole first. Pro tip: Cut an old basketball in half and poke your drill bit through it to create a "dust bowl" that catches debris while you cut overhead. Use your adjustable hole saw to cut the main openings.
3. Run the Wiring
Identify your power source. This is often the wires from the old light fixture you removed. Use fish tape to pull Romex cable from the power source to the first hole, then "daisy chain" the wire from the first hole to the second, and so on. Leave about 18 inches of slack hanging out of each hole.
4. Connect and Secure
Open the junction box on your light fixture. Strip about 3/4 inch of insulation off your wires. Connect black to black (hot), white to white (neutral), and green or bare copper to the ground wire. Use wire connectors and ensure they are tight.
Push the junction box into the ceiling, then squeeze the spring clips on the light fixture and insert it into the hole. The clips will snap down, holding the light flush against the drywall. If you run into issues with existing fixtures not working during this process, check out our lighting repair services.
5. Trim and Test
Attach the decorative trim (if separate) and screw in your LED bulbs. Head back to the breaker box, restore power, and enjoy your newly illuminated space!
Overcoming Common Installation Challenges
Not every ceiling is a flat, empty canvas. Here is how we handle the tricky spots:
- Vaulted Ceilings: You’ll need "slope ceiling" housings and "eyeball" or "gimbal" trims. These allow you to angle the bulb so the light shines straight down even though the ceiling is slanted.
- Insulation: Always verify your fixtures are IC-rated. If you’re working in an attic, follow scientific research on working safely with fiberglass insulation by wearing long sleeves and a respirator.
- Obstructions: If you hit a joist you didn't expect, don't panic. Ultra-slim LED "wafer" lights are often thin enough to be installed directly under a joist, provided you have enough room for the small junction box nearby.
- Smart Home Integration: Many modern LED kits are compatible with smart hubs. This allows you to dim your lights or change color temperatures (from warm 2700K to cool 5000K) using your phone or voice commands.
Frequently Asked Questions about Recessed Lights
Can I install recessed lighting myself or should I hire a pro?
If you are replacing an existing light fixture and using the same wiring, it is a very manageable DIY project. However, if you need to run a brand-new circuit from your main panel, or if your home has older cloth-insulated wiring, you should hire a professional. In Massachusetts, major electrical alterations often require permits and inspections to ensure safety and maintain your home's insurance validity.
How much does professional installation cost per light?
On average, professional electricians in the Middlesex or Essex County areas charge between $125 and $200 per light, including labor and basic materials. While DIY can save you money upfront, a pro can often install up to 12 lights in a single day, ensuring every connection is secure and code-compliant.
Why are my new recessed lights flickering or buzzing?
This is almost always a compatibility issue with your dimmer switch. Older dimmers were designed for incandescent bulbs. If you switch to LEDs, you must install a "CL" rated dimmer designed for LED loads. Loose wire connectors or overheating (due to non-IC fixtures being covered in insulation) can also cause these issues.
Conclusion
A successful recessed lighting installation transforms the mood and functionality of your home, making it feel larger and more modern. Whether you're brightening a kitchen in Reading, MA, or adding accent lights to a living room in Boston, the key is in the planning.
At Sartell Electrical Services, Inc., we’ve spent over 30 years helping Massachusetts homeowners achieve professional results. We pride ourselves on excellence, leadership, and a commitment to customer service that is second to none. If you find yourself stuck behind a joist or uncomfortable with the wiring, don't hesitate to reach out.
Contact our experts for professional electrical services today for a consultation or to schedule your next project. We're here to make sure your home shines safely!